
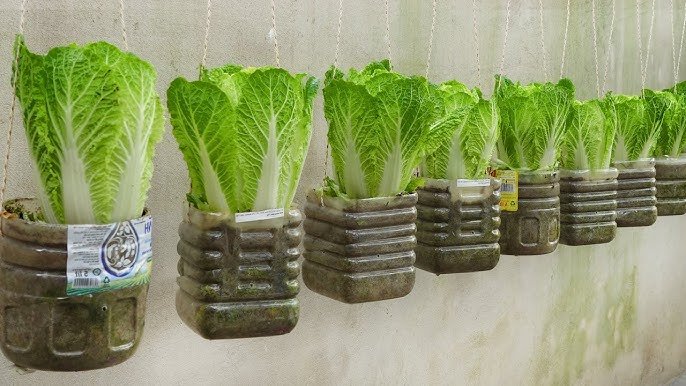
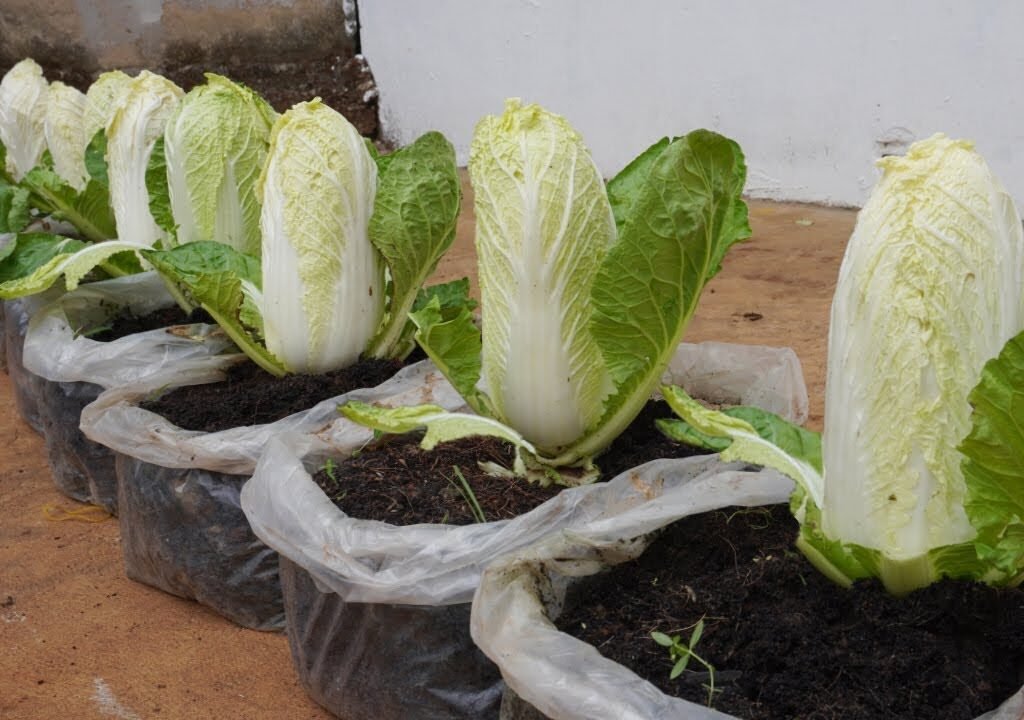
Growing your own fresh vegetables doesn’t always require a big garden or fancy equipment. In fact, with a bit of creativity, you can grow nutritious greens right on your balcony, terrace, or backyard using simple household items. One of the best examples is growing Napa cabbage (Chinese cabbage) in plastic bags — a smart, space-saving, and fast-growing technique that’s gaining popularity among home gardeners.
This method combines the principles of container gardening with the natural adaptability of Napa cabbage, allowing even beginners to enjoy crisp, tender leaves in just a few weeks. Whether you’re a seasoned gardener or a first-time grower, this easy and effective technique will help you harvest healthy, delicious cabbages from the comfort of your home.
In this detailed guide, we’ll cover everything you need to know — from selecting seeds and preparing plastic bags to maintaining, harvesting, and enjoying your fresh Napa cabbage crop.
Why Grow Napa Cabbage in Plastic Bags?
Napa cabbage (Brassica rapa subsp. pekinensis), also known as Chinese cabbage, is a cool-season vegetable loved for its sweet, mild flavor and tender texture. It’s an essential ingredient in many Asian dishes, such as stir-fries, soups, and kimchi.
Here’s why growing Napa cabbage in plastic bags is such a great idea:
- Space-saving: Perfect for urban gardening or small spaces.
- Mobility: You can easily move the bags to catch sunlight or protect them from harsh weather.
- Low cost: Plastic bags are cheap or easily recycled from packaging.
- Water-efficient: Plastic helps retain soil moisture and reduces evaporation.
- Faster growth: Controlled soil conditions promote quick root development and healthy growth.
This innovative approach is practical, sustainable, and surprisingly productive — making it an excellent solution for gardeners with limited space or budget.
Choosing the Right Variety of Napa Cabbage
For plastic bag gardening, select compact or fast-maturing Napa cabbage varieties. Some excellent choices include:

- ‘Michihili’ – A long, slender variety that matures quickly (around 60 days).
- ‘Monument’ – Produces dense, upright heads ideal for smaller containers.
- ‘Blues’ – Resistant to bolting and adaptable to various climates.
- ‘China Express’ – Compact, crisp, and perfect for urban setups.
Choose a variety that matches your local climate — cooler regions will favor spring or autumn planting, while warmer areas can grow it almost year-round with partial shade.
Materials You’ll Need
To get started with growing Napa cabbage in plastic bags, you’ll need just a few simple items:
- Large plastic bags (preferably 5–10 liters capacity)
- Potting mix (or garden soil enriched with compost)
- Napa cabbage seeds
- A watering can or spray bottle
- Organic fertilizer (like compost, vermicompost, or liquid seaweed)
- A sharp object (like a knife or stick) for drainage holes
Optional: Mulch, shade net, and natural pest repellents (like neem oil).
Step 1: Preparing the Plastic Bags
The key to success is ensuring proper drainage and aeration in your plastic bags.
- Choose sturdy bags that can hold soil without tearing. Reused rice sacks or fertilizer bags are ideal.
- Make drainage holes at the bottom and sides using a knife or scissors to prevent waterlogging.
- Fill the bags with potting mix — about two-thirds full. A good mix would be:
- 40% garden soil
- 40% compost or organic manure
- 20% coco peat or sand (for aeration)
- Moisten the soil lightly before planting to help seeds germinate faster.
Tip: If you’re using black plastic bags, line the inner surface with a light-colored cloth or reflective sheet to prevent overheating in direct sunlight.
Step 2: Planting Napa Cabbage Seeds
You can start Napa cabbage from seeds directly in the plastic bag or transplant seedlings later.
Direct Sowing Method:

- Make small holes (¼ inch deep) in the center of the bag.
- Drop 2–3 seeds per hole and cover lightly with soil.
- Mist the surface gently with water.
- After germination (5–7 days), thin out weaker seedlings, leaving only the strongest one per bag.
Transplanting Method:
If you’ve started seeds in trays, wait until seedlings have 3–4 true leaves before transplanting them into bags. Carefully handle the roots to avoid shock.
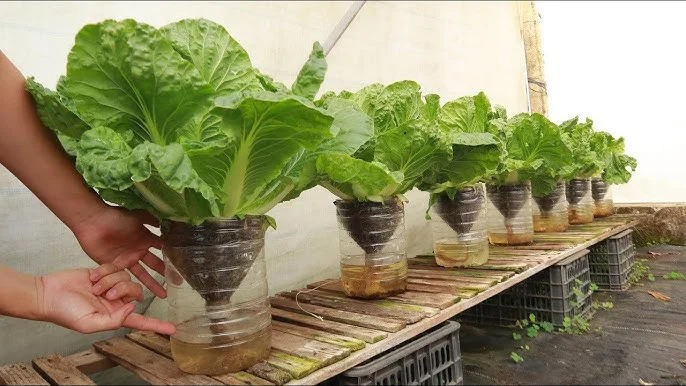
Step 3: Ideal Growing Conditions
Napa cabbage thrives in cool, moist environments with moderate sunlight.
- Temperature: 13°C–24°C (55°F–75°F) is ideal.
- Sunlight: 4–6 hours of direct sunlight per day. If it’s too hot, provide partial shade.
- Watering: Keep the soil consistently moist but not waterlogged. Water deeply every 2–3 days.
- Humidity: Slightly humid conditions promote lush leaf growth.
Place the plastic bags in an area that receives morning sunlight and afternoon shade to avoid heat stress.
Step 4: Feeding and Care
To achieve fast growth and healthy cabbages, proper nutrition is essential.
Fertilization Schedule:
- At 2 weeks: Apply diluted organic liquid fertilizer or compost tea.
- At 4 weeks: Add vermicompost or well-rotted manure around the base.
- Every 10–15 days: Feed with a nitrogen-rich organic fertilizer to encourage leafy growth.
Mulching:
Cover the soil surface with straw, dried leaves, or coco husk to retain moisture and reduce temperature fluctuations.
Weeding:
Occasional weeding may be necessary, though plastic bags typically reduce weed growth significantly.

Step 5: Pest and Disease Management
Napa cabbage can be prone to common brassica pests like aphids, caterpillars, and flea beetles. But growing in plastic bags naturally reduces pest problems since the plants are elevated and more isolated.
Natural Pest Control Tips:
- Spray neem oil solution (5 ml per liter of water) weekly as a preventive measure.
- Use garlic or chili spray to repel insects naturally.
- Remove damaged or yellowing leaves promptly.
- Encourage beneficial insects like ladybugs and lacewings in your garden.
Keep an eye on leaf undersides, as that’s where pests usually hide. Healthy soil and regular watering go a long way in keeping plants strong and pest-resistant.
Step 6: Promoting Faster Growth
The secret to fast-growing Napa cabbage lies in consistent care and nutrient balance. Here are a few pro tips to accelerate growth:
- Consistent Moisture: Napa cabbage has shallow roots that dry out easily. Keep the soil evenly moist.
- Temperature Control: During hot days, move the bags to a shaded area.
- Frequent Feeding: Small, regular doses of organic fertilizer yield better results than large infrequent ones.
- Loose Soil: Occasionally loosen the top layer of soil to improve aeration and root activity.
- Spacing: If you’re growing multiple bags, keep at least 12–15 inches between them for air circulation.
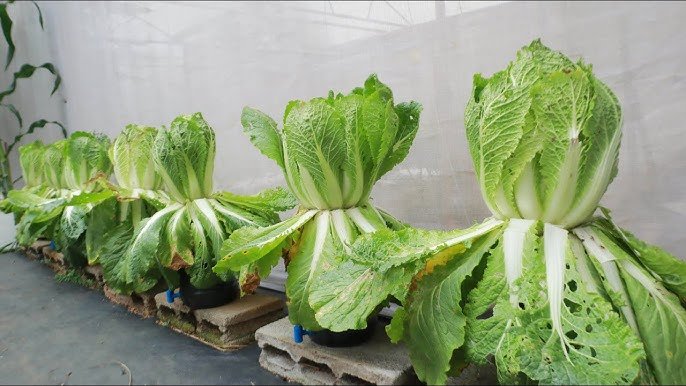
Under optimal conditions, you can expect your cabbage heads to mature within 60–70 days.
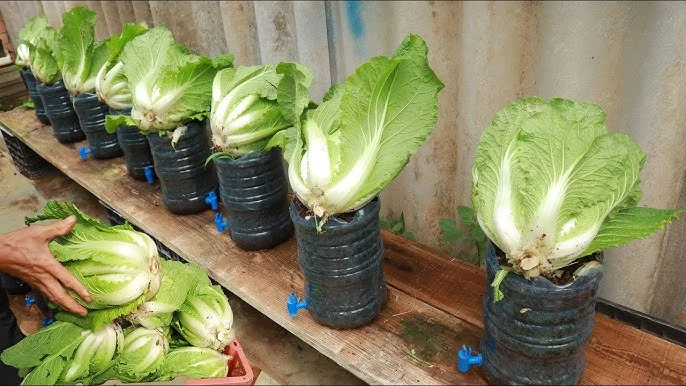
Step 7: Harvesting Napa Cabbage
Knowing when and how to harvest Napa cabbage is key to enjoying crisp, tender leaves.
When to Harvest:

- Most varieties are ready 60–80 days after planting.
- Harvest when the head feels firm and compact when gently squeezed.
- Avoid waiting too long — over-mature heads may split or turn bitter.
How to Harvest:
- Cut the head off at the base using a sharp knife.
- Leave the outer leaves and root system in the bag — they can sometimes regrow smaller side heads.
- Clean gently to remove soil and old leaves.
You can store harvested Napa cabbage in a refrigerator for up to 2 weeks.
Step 8: Reusing the Soil and Bags
After harvesting, don’t throw away your growing setup! The soil and bags can be reused with a bit of care.
- Remove old roots and refresh the soil with compost before planting again.
- Rotate crops by planting leafy greens like lettuce or spinach next to prevent nutrient depletion.
- Clean the bags with mild soap and water to prevent disease buildup.
Reusing materials not only saves money but also reduces plastic waste — making your gardening method more eco-friendly.
Benefits of This Plastic Bag Growing Method
This creative gardening method offers multiple benefits:
- Cost-Effective: Uses recycled materials and requires minimal investment.
- Portable: Easy to move, rotate, or rearrange for light and temperature control.
- Low Maintenance: Reduced weeds, less water loss, and cleaner produce.
- Year-Round Potential: You can grow indoors or outdoors depending on the season.
- Eco-Friendly: Encourages reuse of plastic and promotes sustainable urban farming.
This approach allows anyone — even apartment dwellers — to grow nutritious vegetables without traditional land or garden beds.
Final Thoughts
Growing Napa cabbage in plastic bags is an excellent example of modern, practical urban farming. It proves that you don’t need vast farmland or expensive materials to produce fresh, healthy vegetables. With just a few recycled bags, some good soil, and regular care, you can enjoy crunchy, homegrown cabbage within two months.

This fast-growing, easy-to-manage technique not only provides fresh food for your table but also contributes to a more sustainable lifestyle. Whether you’re planting for personal use or small-scale sales, this innovative method is efficient, eco-friendly, and highly rewarding.
Leave A Comment