
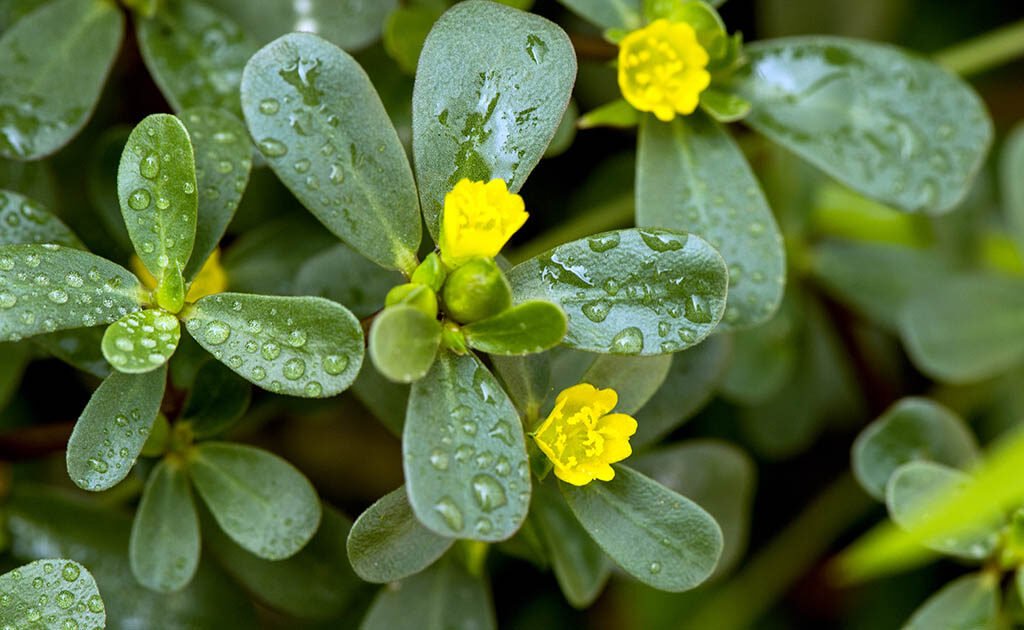
If you’re looking for a hardy, nutritious, and low-maintenance plant to grow at home, purslane is an excellent choice. Known for its succulent leaves, vibrant red stems, and mild, slightly tangy flavor, purslane is a versatile plant perfect for salads, stir-fries, and garnishes. Even better, it thrives in small spaces and can grow in recycled plastic bottles, making it ideal for urban gardening or sustainable container gardening.
In this guide, we’ll show you the best method to grow purslane in plastic bottles, focusing on propagation from cuttings, care tips, and how to maintain a thriving bottle garden. By the end, you’ll have a lush mini garden of purslane ready to harvest in just a few weeks.
🌱 Why Grow Purslane in Plastic Bottles?
Purslane is a tough, drought-tolerant plant that grows well in containers, making it perfect for bottle gardening. Using plastic bottles has several advantages:
- Eco-Friendly: Repurpose waste bottles and reduce plastic pollution.
- Space-Saving: Ideal for balconies, windowsills, or small patios.
- Portable: Move your plants to catch the best sunlight.
- Cost-Effective: No need for expensive pots—just recycled bottles.
- Easy Water Management: Bottles allow controlled soil moisture for succulents like purslane.
This method also makes it easier to propagate purslane from cuttings, ensuring a steady supply of fresh, edible leaves.
🪴 Materials You’ll Need
To grow purslane in plastic bottles, gather the following:

- Empty plastic bottles (1–2 liters work best)
- Sharp scissors or knife
- Garden soil or potting mix (well-draining)
- Sand or perlite (optional, for aeration)
- Organic compost or vermicompost
- Purslane cuttings (from a healthy plant)
- Small tray or saucer (to catch water)
- Spray bottle for gentle watering
Optional: A small stick or pencil to make holes in the soil for inserting cuttings.
✂️ Step 1: Preparing Plastic Bottles
- Clean and dry the bottles thoroughly.
- Cut the bottle horizontally, keeping the bottom portion as the planter.
- Poke 3–4 drainage holes at the base to avoid waterlogging.
- Optional: Place a thin layer of small stones at the bottom for extra drainage.
💡 Pro Tip: If you want a self-watering setup, invert the bottle top (with the cap removed) into the bottom half and insert a cotton wick. This will maintain consistent soil moisture without overwatering.
🌿 Step 2: Preparing the Soil
Purslane thrives in well-draining soil. A simple mix works perfectly:
- 50% garden soil
- 30% sand or perlite
- 20% compost or organic manure
Mix the ingredients thoroughly and fill your bottle planter, leaving about an inch of space from the top for watering.
💡 Tip: Avoid heavy clay soil, which can retain too much water and cause root rot.

🌱 Step 3: Propagating Purslane from Cuttings
Purslane grows easily from cuttings, making it one of the simplest plants to propagate:
- Choose a healthy stem from an existing purslane plant. Cut a piece about 3–4 inches long.
- Remove any leaves from the bottom 1–2 inches of the cutting.
- Make a small hole in the soil using a stick or pencil.
- Insert the cutting gently and firm the soil around it.
- Mist lightly with water to settle the soil.
💡 Pro Tip: Purslane cuttings root best when the bottom leaves are removed, allowing the stem to focus on root growth.
☀️ Step 4: Providing the Right Sunlight
Purslane loves full sunlight, which helps it grow thick, juicy leaves and vibrant red stems.
- Place your bottles in a location that receives 4–6 hours of sunlight daily.
- In extremely hot weather, provide partial shade to prevent leaf scorching.
- If growing indoors, place near a south-facing window or use LED grow lights for 6–8 hours per day.
💧 Step 5: Watering Your Purslane
Although purslane is drought-tolerant, young cuttings need consistent moisture to establish roots:
- Water lightly every 2–3 days or when the soil surface feels dry.
- Use a spray bottle to avoid washing away soil or disturbing the cuttings.
- Ensure that water drains through the holes at the bottom.
💡 Tip: Once established, purslane can tolerate dry spells, but regular watering produces larger, juicier leaves.

🌿 Step 6: Fertilizing for Healthy Growth
Purslane is not a heavy feeder but benefits from occasional nutrition:
- Mix a small amount of compost into the soil every 3–4 weeks.
- Liquid fertilizers like seaweed extract or compost tea can be used once a month.
- Avoid over-fertilizing, as purslane naturally thrives in nutrient-light soils.
💡 Tip: Over-fertilized purslane may grow too tall with fewer leaves, reducing the yield.
✂️ Step 7: Maintenance and Care
Purslane is low-maintenance, but proper care ensures optimal growth:
- Pruning: Trim the plant regularly to encourage bushy growth and prevent it from becoming leggy.
- Remove Yellow Leaves: Discard any damaged or yellow leaves to promote healthy new growth.
- Pest Control: Purslane is generally pest-resistant, but occasional aphids or mites can appear. Spray neem oil or mild soap water if needed.
- Support: If stems grow long and floppy, gently tuck them back into the soil or prune to maintain a compact plant.
🌱 Step 8: Harvesting Purslane
Purslane can be harvested in 3–4 weeks after planting cuttings. Here’s how to do it:
- Use scissors or fingers to pick the outer stems and leaves first.
- Leave the center intact to allow continued growth.
- You can harvest continuously throughout the season, as the plant keeps producing new shoots.
💡 Pro Tip: Harvest in the morning when leaves are crisp and juicy. Purslane has the best flavor and texture when picked fresh.

🥗 Step 9: Using Purslane in Your Kitchen
Purslane is highly nutritious and versatile. Its leaves and stems can be used in:
- Fresh salads with lemon, olive oil, and spices
- Stir-fries with garlic and vegetables
- Soups and stews for a slightly tangy flavor
- Smoothies for a nutrient boost
- Pickling for long-term storage
Purslane is rich in omega-3 fatty acids, vitamins A and C, magnesium, and antioxidants, making it a healthy addition to any diet.
🌿 Step 10: Advantages of Bottle Gardening
Growing purslane in plastic bottles is not just about space efficiency—it also offers several benefits:
- Recycling Plastic: Reduces environmental waste by giving bottles a new purpose.
- Urban Gardening: Perfect for apartments and small outdoor spaces.
- Cost-Effective: No need for expensive pots or planters.
- Easy to Monitor: Track soil moisture, root growth, and plant health easily.
- Portable Mini-Garden: Move your plants to optimize sunlight or protect from harsh weather.
Bottle gardening makes it simple to grow edible greens, herbs, and vegetables even with limited resources.
🌱 Tips for Success
- Succession Planting: Plant new cuttings every 2–3 weeks to ensure continuous harvest.
- Rotate Bottles: Move bottles occasionally to ensure uniform sunlight exposure.
- Avoid Overcrowding: Give each cutting enough space for roots to grow.
- Reuse Bottles: Wash and refill bottles for future crops once plants are harvested.
- Mix Plants: Try companion planting with herbs like basil, coriander, or mint in nearby bottles.
🌎 Final Thoughts
Growing purslane in plastic bottles is a sustainable, simple, and highly rewarding gardening method. By using cuttings, you can propagate this resilient plant quickly, creating a continuous supply of nutritious, flavorful greens right at home.

From preparation and planting to watering, fertilizing, and harvesting, bottle gardening allows you to enjoy the full experience of growing your own food—even in the smallest spaces. Plus, it promotes recycling and eco-conscious living, proving that even waste materials can be transformed into something productive and life-giving.
So next time you have a leftover plastic bottle, don’t throw it away—turn it into a mini purslane planter and start your sustainable gardening journey today.
Leave A Comment